I don't really have original ideas, but I'm willing to try just about anything. Even web design (haha!).
Showing posts with label crafts. Show all posts
Sunday, July 3, 2011
Homemade Wire Baskets
Someone online was creative enough to make their own wire mesh baskets using this stuff. It's called Hardware Cloth and it's found in the gardening section of stores like The Home Depot and Lowe's. I got my roll for like $13 and in this picture I've used a bunch already. It started out like 10 feet long by 2 feet wide. There are different sizes.
Considering that purchasing a basket costs anywhere from $8 to $30, I think this is a deal!
I didn't take any pics of the cut out shapes, but basically I used a bunch of the wire just figuring out what I wanted. My husband requested something (3 of them actually) he could hang on the side of his desk. I cut it using wire cutters (gave myself a blister - it's work cutting so many pieces of wire!) and there was a lot of trial and error. I did make a basket that was the same size at the top as at the bottom, but I thought it would be too difficult to put your hands in.
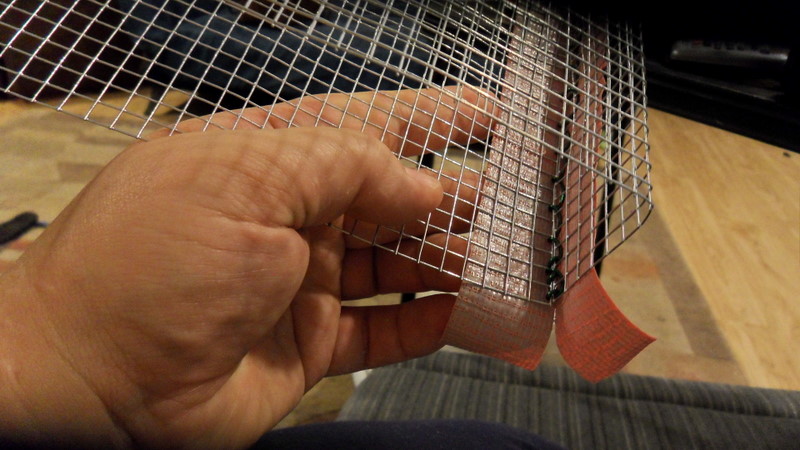
Also, since the edges were newly-cut wire, I needed something to make them less poky. I was going to make a liner, but duct tape was a whole lot less effort.
I "sewed" the raw edges together with 18-gauge crafting wire that I had just hanging around. Yeah, I have lots of supplies like that hanging around, but if I didn't, it would cost something like $2 for a roll that makes 2 or 3 baskets.
One of the final products. I made 3 of them that match. I think they turned out quite nice and I still have plenty of wire to make more baskets.
Tuesday, June 14, 2011
Bottle Monsters
Sorry I don't have pics of the whole process.
Materials and Supplies List:
* Two bottles that match (any size).
* Zipper to fit around (2-liter bottles take a 12-inch zipper, I think the skinny bottles in the pic were 20-ounces and took a 9-inch zipper - you can use a bigger zipper and cut it down but that's more complicated).
* Garnishments (googly eyes, pipe cleaners, scrap fabric, fake fur, etc.).
* Hot glue gun and glue.
* Craft scissors (to cut plastic and stuff).
* Imagination!
Step 1: Pinch your bottle on the side (not tight - you don't want the crease to stay) and cut. You only need enough cut to stick your scissors in the hole. Cut around the bottle to the size you want. The green monsters in front are just the bottom parts of regular 2-liter bottles (there's a nice line there to use as a guide). I like the tops to be short, but I like the bottoms to be different sizes. Make the cut as even and smooth as you can.
Step 2: Install the zipper. This is by far the most complicated part of the process. It looks best if the zipper is on the inside, and it's easiest if your zipper starts at the right size (you can cut it down if you have to - hot glue the end so your kid can't unzip it completely or it's a beast to get back in).
I used a process of trial and error for the zipper install, but I discovered that if your glue gun is high heat, it will melt the plastic of the bottle if you put it directly there (put it on the zipper first and wait a couple seconds and it'll be fine).
I also discovered that you have to leave a small margin between the plastic of the bottle and the plastic (or metal) of the zipper or it's impossible to zip.
Step 3: Embellish. My sis-in-law got really creative with the yarn hair and fabric scraps, and the kids had a lot of fun with the fake fur.
My 4-year-old filled his bottle with water (the one with the orange ears) and dumped it out saying it was monster throw up. Fun times.
Materials and Supplies List:
* Two bottles that match (any size).
* Zipper to fit around (2-liter bottles take a 12-inch zipper, I think the skinny bottles in the pic were 20-ounces and took a 9-inch zipper - you can use a bigger zipper and cut it down but that's more complicated).
* Garnishments (googly eyes, pipe cleaners, scrap fabric, fake fur, etc.).
* Hot glue gun and glue.
* Craft scissors (to cut plastic and stuff).
* Imagination!
Step 1: Pinch your bottle on the side (not tight - you don't want the crease to stay) and cut. You only need enough cut to stick your scissors in the hole. Cut around the bottle to the size you want. The green monsters in front are just the bottom parts of regular 2-liter bottles (there's a nice line there to use as a guide). I like the tops to be short, but I like the bottoms to be different sizes. Make the cut as even and smooth as you can.
Step 2: Install the zipper. This is by far the most complicated part of the process. It looks best if the zipper is on the inside, and it's easiest if your zipper starts at the right size (you can cut it down if you have to - hot glue the end so your kid can't unzip it completely or it's a beast to get back in).
I used a process of trial and error for the zipper install, but I discovered that if your glue gun is high heat, it will melt the plastic of the bottle if you put it directly there (put it on the zipper first and wait a couple seconds and it'll be fine).
I also discovered that you have to leave a small margin between the plastic of the bottle and the plastic (or metal) of the zipper or it's impossible to zip.
Step 3: Embellish. My sis-in-law got really creative with the yarn hair and fabric scraps, and the kids had a lot of fun with the fake fur.
My 4-year-old filled his bottle with water (the one with the orange ears) and dumped it out saying it was monster throw up. Fun times.
Subscribe to:
Posts (Atom)